
KA1MDA HOW-TO:
INTERFACING THE JPS COMMUNICATIONS
RRU-100 RETRANSMISSION UNIT
This unit was another Ebay find. Although the guy selling it had no idea what it was, the photos he posted on Ebay were clear enough to give me a hint that this might be something interesting to tinker with. Besides, with a $10 minimum bid, how could I pass it up? In the end, my $11 bid turned out to be the winning high bid for the item! While waiting for my unit to arrive, I tried searching the internet for information about the unit. I soon discovered that such information was non-existant.
I found some references to JPS exiting (or perhaps abandoning) the amateur radio market to concentrate on its commercial inter-operability products. I also turned up some posts in various forums seeking support information or operating instructions for other JPS products. In the end, the only concrete information I could find after a number of searches was a poor resolution pdf file of some advertising material. It soon became quite apparent that I would have to do a little bit of reverse engineering to figure out how to hook this unit up. The information presented below, resulting from my experiments with the JPS RRU-100, has been posted here to aid other amateur radio operators who may have found one of these units on the used market.
INITIAL INSPECTION
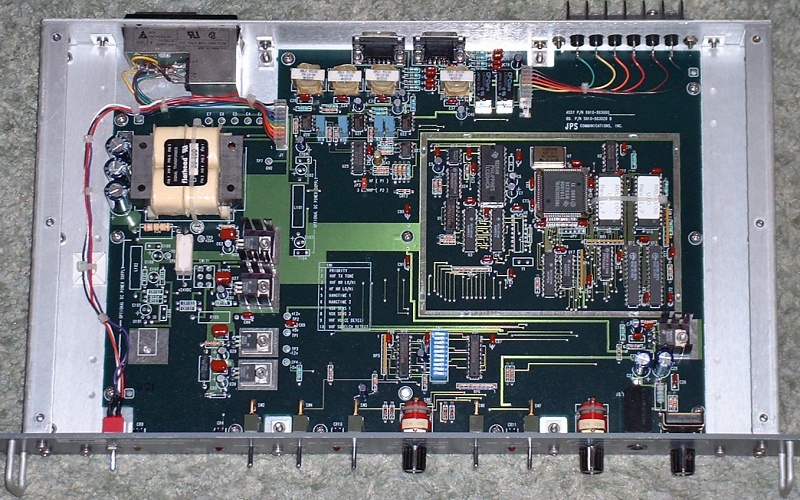
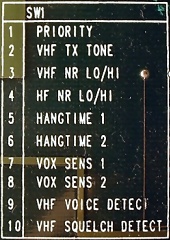
A visual inspection of the unit revealed a barrier strip and a pair of DB-9 connectors on the rear panel for interfacing the unit with radio equipment. Internally, there was a row of DIP switches near the front center of the PCB, and 4 10-turn pots located near the back near the radio connectors (left- click on the photo for a larger, more detailed image). The only set-up information I could find was a cryptic DIP switch function label printed on the unit's circuit board (right). Although some of the labels were a bit ambiguous, at least I had a starting point to work from.
RADIO PORT PIN-OUTS
The next step involved completely disassembling the unit to gain unrestricted access to both sides of the prionted circuit board. This would aid in establishing a pin-out for the DB-9 radio ports by following the various foil traces on the PCB leading to these connectors. It appeared that unit featured balanced audio inputs and outputs, as well as both normally open and normally closed relay contacts for the PTT function. The results are shown in the image at left. I wired up a set of DB-9 to PS-2 interconnecting cables, which allowed me to connect the RRU-100 to the packet DATA jacks on my radio equipment.
AUDIO LEVEL ADJUSTMENT
Now that I had a set of interconnecting cables, I could begin experimenting with the RRU-100's internal settings and adjustments. With the transmitting radio connected to a dummy load, I monitored the transmit frequency with a second radio while adjusting the various 10-turn pots to determine their function. The results are shown at left.
DIP SWITCH SETTINGS
With the audio levels set, I could now experiment with the DIP switch functions. The table at left shows settings for some of the DIP switches. Squelch hang time is adjustable from 1 to 4 seconds in 1 second incrememnts using SW5 and SW6. As far as I can determine, the PRIORITY function of SW1 appears to determine which side of the RRU-100 (HF or VHF) takes keying priority if signals appear on both ports simultaneously. I am still experimenting with the other switch settings.
FINAL IMPRESSIONS
All in all, the JPS RRU-100 retransmission unit was a lot of fun to play around with. One of it's most impressive features was a form of "smart squelch", which I assume is a function of the DSP noise reduction process. This "smart squelch" feature has the ability to discern human speech from the various carrier heterodynes and QRN which are all too common on the HF bands. It was really amazing to watch the unit rebroadcasting S3 voice transmissions from HF, yet ignore S9+20 carriers! When a strong carrier or noise appeared on HF, the unit would start rebroadcasting, but then drop out within milliseconds when it determined there was no intelligible voice content in the HF audio! the unit's DSP noise reduction also proved useful. It's effect was subtle, yet effective, with few DSP generated artifacts and none of the waterfall sound associated with typical amateur DSP units. Of course, if the price list I found in one of my web searches was accurate, such performance should not be surprising as this unit originally cost more than an ICOM 746PRO or a Kenwood TS-2000! Bottom line- $11 well spent. You have to love Ebay!